
Hello Friends & Folk ~
and a very happy Sunday to us all...
If you are a follower of mine on Facebook or Instagram,
you may remember that I am in the process of working on a sweet little embroidered angel.
~ and that I promised to share with those interested how I create the faces on my embroidered-folk.
so as promised and as a gift to you, here is the Embroidery Angel Template FREEBIE
for you to download and use to stitch along with me as I work...
 | |
| click on this template to bring to full size, then copy/save it to your computer. |
I like to use osnaburg for my embroidery, but you can use muslin or even tightly woven linen.
I use a #2 Ticonderoga Pencil {soft lead} with a nice sharp point, and a lightbox to trace my designs onto my cloth...place your paper template on your lightbox, then place your cloth on top of that and trace through using your pencil.
I am using DMC threads for this project.
I will be using 3774 & 739 for the face and hand.
I am also using Three (3) Strands of thread for this project, at about 12" long...
and mostly the Split Stitch and short straight or fill-in stitches...
~ my needle of choice is a simple DMC brand darners needle
that my hand has bent by making many tiny stitches!

Once my threads are divided into three strands,
I'll thread my needle with my 739 color and knot it at the needle end {half knot}
to keep the thread from pulling off as I stitch,
and YES, I also knot the other end to keep from pulling through my fabric...

Once my design is drawn onto my cloth, centered and put into a hoop {in this case a 5" hoop}
~ and we will work on outlining her face first:
I will make my first stitch...coming up from underneath {the back of your work}
and at the very edge of the line I drew...until you feel the knot at the end of your thread hit the back of your project...do not pull too aggressively or you will separate the weave of your cloth.

now you will put your needle back down into your cloth, following the outline
and making a very small, almost 1/8" size stitch.

now bring your needle back up, from the back of your project, through your first stitch made
....'splitting' your stitch as shown below:
NOTE: since you are using 3 strands of floss,
there will be no way to split your threads exactly as the number is uneven...this is fine.

next, take your needle and put it down into your cloth,
again staying on the drawn line and make another tiny stitch...
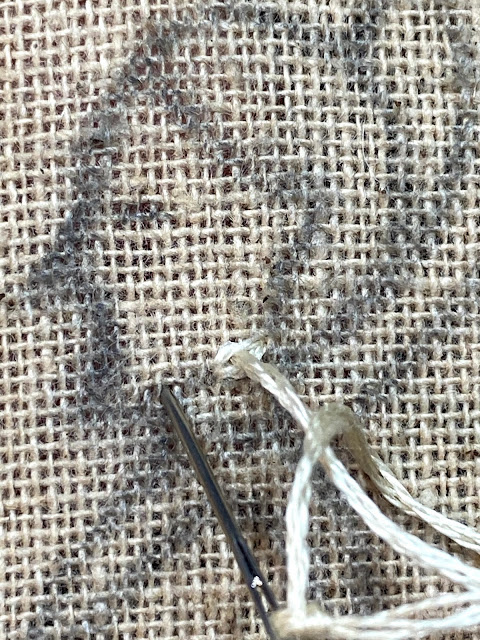
now you have made two split stitches...
they resemble tiny chain stitches, but are not the same.as chain stitch...

Now just continue to make your split stitch outline...
all the way around the face out line only, not the hair...
all the way around the face out line only, not the hair...

Once the face is outlined in split stitch,
you will make two short straight stitches where the eye will be, as shown below...the upper and lower lids.

You can see below,
I began filling in the nose a bit using split stitches,
then I will make another small straight stitch to indicate the mouth...


continue to fill in the face with tiny split stitches...think about the direction of your stitches
as you round turns {like the ear} and point of nose/chin...

now you can make a few small straight stitches for the neck,
as seen in the photo below ~
starting from the back, and working to the front, making them smaller as you go and staying within your template lines...

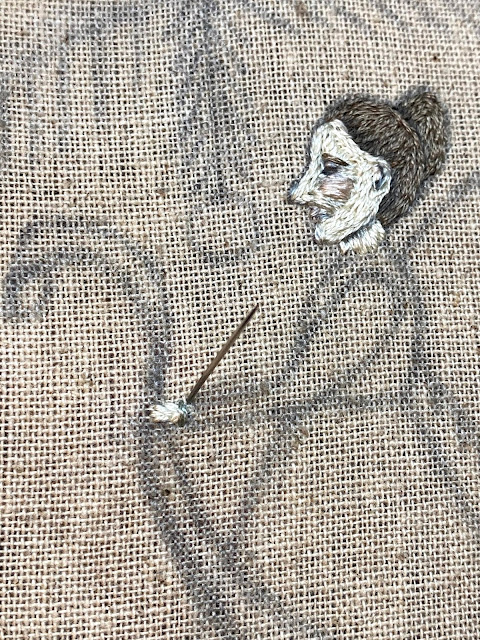
Next, I want to create a 'cheek' on her filled in face...
I'll again use three strands of DMC floss, but this will be the color 3774...

using my paper template as a placement guide,
using my paper template as a placement guide,
I stitch OVER the split stitches where I want her cheek to be...
using horizontal straight stitch.

Now her cheek is stitched, & I'm happy with it {lol}
If you click on the photo below,
you will also see that I stitched two teeeeeeny little lips,
and around the upper-inside curve of her ear with the same thread used for her cheek:
AND NOW THE FUN BEGINS!....
grab your pencil....make sure it is nice and sharp ~

place the point of your sharp pencil down into your stitches,
...between those little eyelids you initially made...don't be scared, and use a light hand...

try to imagine where shadows fall, or details like the line between her neck and jaw...
see the pencil shading in her ear? above her eye?
use your pencil to gently shade these areas,
and also lightly draw around the face {on the cloth} to help it stand out...

Next Step will be her hair, eyebrow and dress...
the DMC colors I used for that are: 3790, 646 & 647.
using the same outline & fill technique as the face, 3 strands of floss {throughout entire project}
fill in her hair closest to her head first {split stitch}, then stitch her bun...
then make a small straight stitch above her eye for an eyebrow.


use your pencil again to shadow the line between the head hair & bun
and also around her ear, temple and forehead
{stay on the hair for this, as you don't want to shade her 'skin'}

now you can thread your needle again with the DMC 739
and using small straight stitches, stitch her hand...

You are off to a great start!
I will leave off here, as we will work on her dress next ~
I hope you are enjoying this as much as I am enjoying sharing it with you my friends ~
Stay tuned for my next post here on this blog!
Blessings from the Farm
~
Lori
Oh my goodness. How lucky am I to have stumbled upon this wonderful tutorial! I have several of your embroidery patterns (as I cannot do counted cross stitch to save my life!) They are "in the works" other than having finished my Tom Turkey. Lori - thank you so much for sharing this terrific set of instructions. I must go and pick out some fabric and see what floss I have that will work and start stitching this lovely angel.
ReplyDeleteThank you so much! It’s really helpful to see your creative process up close and personal!
ReplyDeleteThanks so much for sharing! It’s real helpful to see your creative process and your mind at work!!
ReplyDeleteWell I'll be dang! I never knew or thought about a knot to prevent the thread from pulling out from the eye of the needle. Guess one could do that with stitching thread, wool yarn or embroidery thread. THANKS!!!!!!
ReplyDeleteThis is so helpful! Thank you! Very nice of you to share your technique!
ReplyDeleteGreat tutorial.
ReplyDeleteTHANK YOU, Lori, for sharing your amazing technique with us!!! I want to drop everything and try this LOL!! ~Robin~
ReplyDeleteThank you for taking the time to show us your technique! Hoping to try this real soon!
ReplyDeleteThank you so much for the pattern!
ReplyDeleteThank you for sharing! If I ever make it back to VA I would love to come to your shop. Betty
ReplyDeleteThis comment has been removed by a blog administrator.
ReplyDeleteso helpful in my current project …thank you
ReplyDeleteI am so blessed for such a talented artist as yourself. I can not tell you how excited to see such a clear close-up of the tutorial. It is so clear and descriptive. Thank You so much and bless you and your family.
ReplyDeleteP.S.
You mentioned you use the DMC thread but in your directions, you say you use three strands of floss. Is it threads or floss? I need some clarification there. Once again, Thank You.