
Hello Friends & Folk!
are you getting festive?
have you begun your Holiday/Winter decorating?
...are you looking for something prim and unique to add to your decor? ~
well then, how about crafting a bunch of Holly Leaves from cotton fabrics?

if you're like me,
you have plenty of fabrics in your stash to use up to make these quick,
easy and NO SEW holly leaves!
my Gift to you ~
a freebie tutorial on exactly how I make mine as shown in the photo above...
First, Download the template for your holly leaves to print out:
here is the template ~
{click on the template to enlarge, then save to your computer and print...
you may resize to suit your needs}

after you have printed your paper template, cut ou the holly leaf shape and place it onto your fabric...I find it easiest to fold my fabric together with right sides facing, trace with a pencil then cut out both pieces at one time... cut out as many leaf shapes as you like, from however many different green {or not!} fabrics you want :)

After you cut out all of your leaf shapes, gather the following supplies:
*instant coffee
*white tacky glue
*paintbrush and small glass

and some floral stem wires ~ mine are green but you can use whatever color you'd like...

now,
mix a tsp. of coffee with half a glass of warm water...you want it to be dark;


Now,
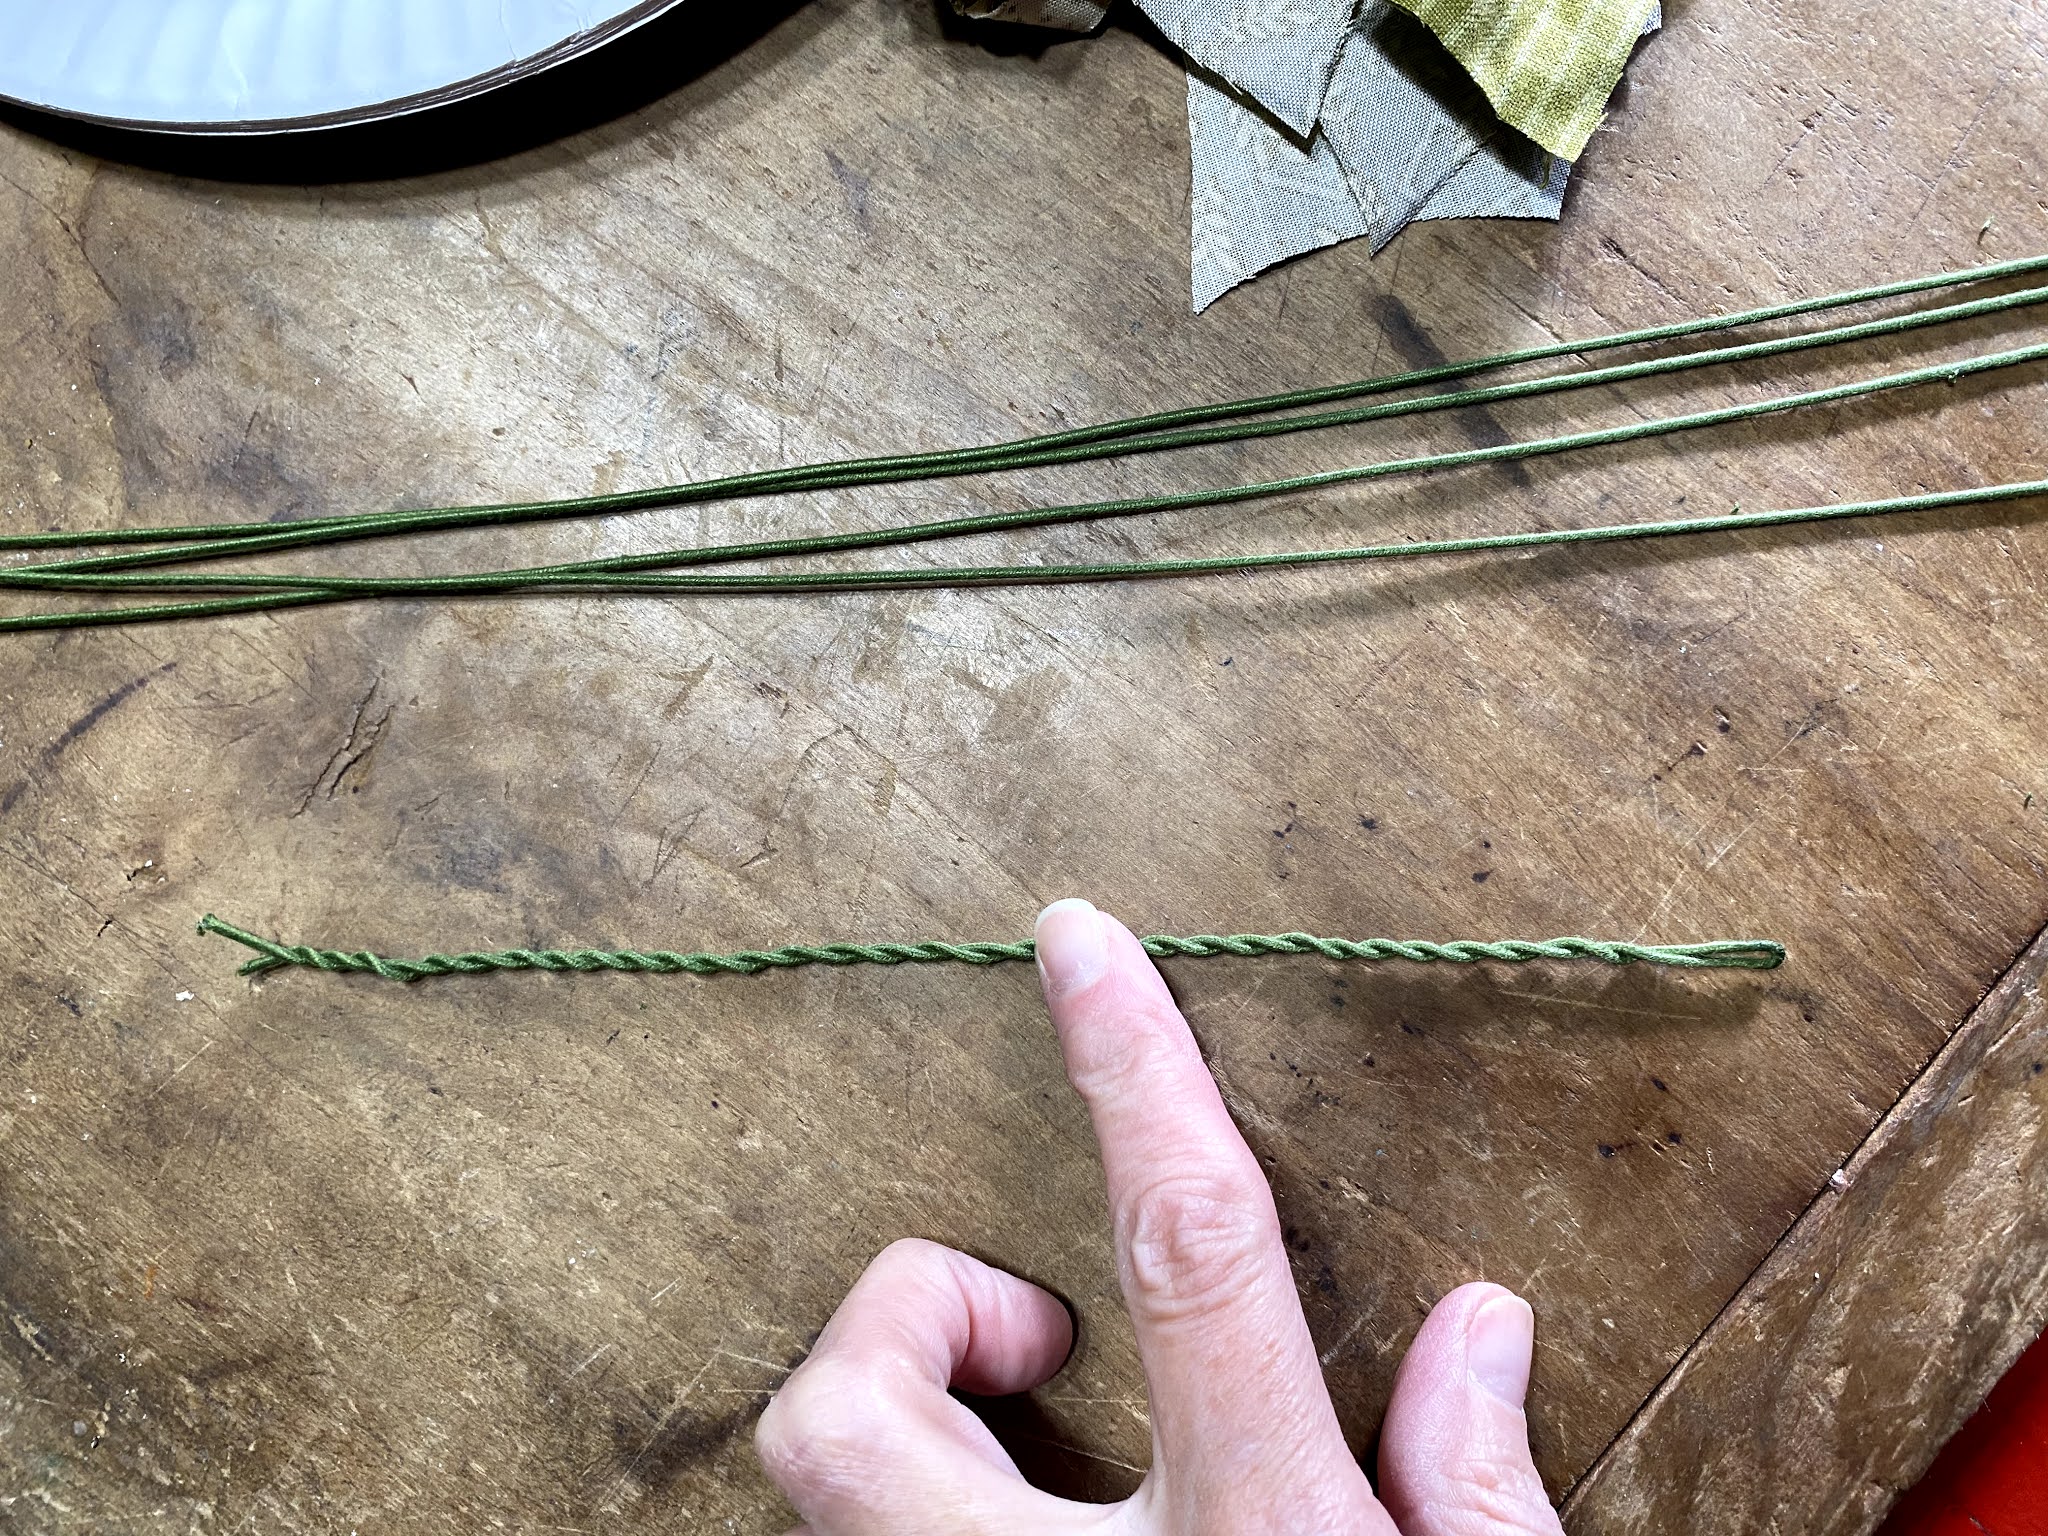
take your floral wire and fold it in half...

then twist the wire onto itself like this:
next,
take the white tacky glue and dot some out on the backside of one of your fabric leaf shapes,

then place your twisted floral wire down onto that:
{i place the 'loop' end of my twisted wire flat against the leaf}

and then place the matching {or not!} fabric leaf shape down on top of that...
making sure to use your fingers to push the two fabric leaf shapes together,
and twist the bottom portion of fabric shape around the wire as in the photo below:

Now set your oven to 350* degrees
{don't get nervous!} and preheat it for about 10 minutes...

then place all of your glued leaves on a towel lined cookie sheet
and dry in that hot oven for about 5 - 8 minutes...

after the glue on the leaves have dried, take them out of the oven {leave oven on}
and using that mixture of coffee and water, brush on the stain down the middle and edges of your leaves,
on BOTH sides...


as you can see, I am not one for making everything 'perfect'...
i don't mind rough edges or loose threads...my leaves may not even match up together on their stems but that is how I like things...
i don't mind rough edges or loose threads...my leaves may not even match up together on their stems but that is how I like things...
~ Perfectly Imperfect ~
now place your coffee stained leaves back on your towel-lined cookie sheet and put them back into the oven to dry...coffee has tannic acids which darken with heat, so the more coffee and the more heat the darker they will become...
let's just not get carried away and make crispy holly leaves, shall we?
and, you may want to repeat the above staining/drying steps to your desired darkness,
depending on the grungy look you like best...

after all of your holly leaves have been stained and dried thoroughly,
you can {or not!} use a Prisma Marker to draw veins onto the leaves...
I prefer to use the Sepia-colored BRUSH marker
{found at most craft stores}
{found at most craft stores}

no need for a heavy hand with the brush-marker...
a few light strokes is best...


Now that your leaves are dried and the veins are drawn on,
you can bunch them up by twisting their wires together ~ I like bunches of threes,
but you can bunch as many as you'd like ~

make sure to bunch leaves together that don't match ~ {or not!}
I like the way tehy look this way...

and finally....
tuck your finished Holly Leaves into a favorite vessel...
maybe an antique vase? or on a wreath?

I tucked mine into one of Peter's hanging wooden heart pockets
that I burned with my woodburning tools...
Well I hope you enjoyed this bit of holiday-frivolity!
&
I would LOVE to see your finished holly leaves...
Blessings from the Farm
~
Lori
Beautiful! Thank you for sharing your talents with us! So grateful for your generous spirit! Happy Thanksgiving to you and yours
ReplyDeleteFantastic and thanks for the tutorial. Now all I need is to find or make a vessel for them. But as you say I've lots of fabric, wool and other objects to use.
ReplyDeleteFun!!! And clear enough that I can even probably manage these LOL!!! The hanging pocket is the perfect "vessel" me thinks. Hope all is well in your world... ~Robin~
ReplyDeleteYou're the best! ❤❤❤
ReplyDeleteMerci pour ce partage
ReplyDeleteOh lori, thank you for a smashing tutorial. Jean
ReplyDeletewonderful prim eye candy for the winter months coming up, thanks for sharing.
ReplyDeleteCan’t wait to try these!!! ❤️❤️❤️ I’ve made some similar that I’ve sewn, but these are so much faster and easier!
ReplyDeleteBlessimgs, Patti
Beautiful! And, easy too! Looks like the perfect way to spend the Sunday afternoon! Don't forget the German glass glitter too! ;-) Thanks so much! :-)
ReplyDeleteLOVE these !!! What a great tutorial too !!! So cute !!! Thank You Lori !!!
ReplyDeleteWhat a fun project and great tutorial!
ReplyDeleteThank you so much! I'm going to get right on this.
ReplyDeletelove this. thanks for sharing.
ReplyDeleteclipping path
ThAnk You. Going to try sometime today. I love these! 🌿🍁🍂🍃
ReplyDelete