Good Sunday Morning
Friends & Folk!
oh boy is it a chilly one here in Old Virginia ~
heavy frost last night, woke to sparkling grass and glistening leaves...so pretty.
It's morning like these, especially a Sunday morning like this ~
that keeps me thankful for wool socks and woodstoves.
keeping my hands warm, however,
is never a problem for me...they are always moving in one sort or another!
either tapping keyboards, stirring pots, petting the soft fur and feather of our farm friends
or most-likely, holding a needle and thread...
working on my embroidery has been the easiest thing for me to do while my eyes are healing.
stitching like this is not as crucially important to the finished piece as counted cross stitch,
but still challenging to me nonetheless ~ with the way I layer my stitches and add details.
take my lastest for example ~
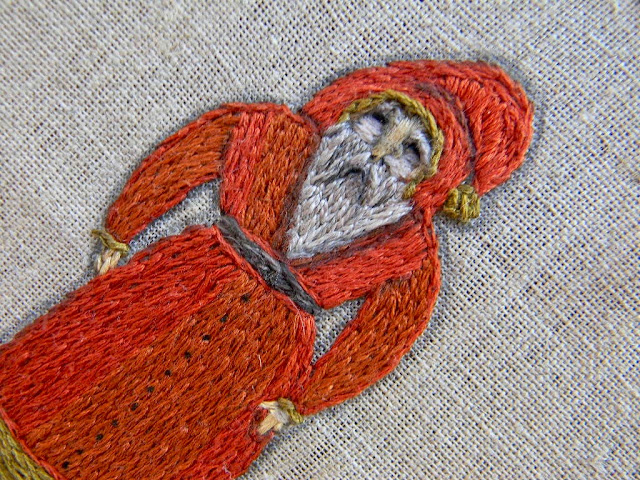
this little "Cinderklaus" and how I stitched him...
many ask me what stitch I use for my embroideries, and my answer is this:
I use a split stitch for outlining AND filling-in my motifs.
yes it looks like chain stitch, but I assure you it is not...
I also use a very short satin stitch, for facial features
and layer them in different directions for depth and dimension.
...here is an example of chain stitch:
chain is worked by bringing the needle through the previous stitch
from the top or surface of your work ~ forming a chain and the 'chain' links are more 'open';
 |
| CHAIN STITCH |
and here is split stitch:
split stitch is worked by bringing the needle UP through the previous stitch
from under your work, splitting the threads of the previous stitch
and forming a tighter 'chain' if you will...
 |
| SPLIT STITCH |
in this photo below,
you can see what I mean about the layering of the short satin stitch for facial features ~
the face is embroidered in different directions, usually vertical from the forehead up, and then horizontally, from the cheeks down...then I will use a different color thread and stitch over my previous stitches to form cheeks, the bridge of a nose or brow-line.
once the face is stitched, then I will add eyebrows/facial hair, etc.
looking a little more closely,
you'll see that I ddn't actually stitch the eyes or mouth for that matter!
I simply use a pencil to draw shadows and added dimension ~
it is a unique-technique that I developed over time, and one that I use in all of my embroideries.
of course, having help is always welcomed...
thank you sweet Iggy for modeling for me
❤
I hope this helps you understand my way of doing this,
if you ever need help, let me know ~
I'm happy to help and love to teach!
don't forget that I also am the creator/administrator for the
Humble Work - hand embroidery group on Facebook ~
a great group where you can learn, share and go for inspiration on embroidery...
here is the link to request to join:
Blessings from the Farm
~
Lori


6 comments:
Cinderclaus is wonderful !!! Love how you showed us your stitching techniques …..it really looks so neat how you create the dimensions.....you are just amazing !!! Such a clever Gal !!!! Thanks for sharing !!!!
Great show and tell. Thanks for showing the difference in the stitches. Love your little red man
Lori, you are such an amazing and creative artist. Needlework is such an important part of my everyday life - the special treasures created and the sharing of ideas and instruction. Needleworkers are such special friends....even when you only meet them online. THANK you for what you do and give to all of us.
Love him!
Thanks for lesson,,,
Going to try soon,,,,
Thanks for sharing ur talents,,,,
He’s just wonderful! Thanks for the tutorial! Good to know. I, however, could never come up with anything looking close to what you can create...your talent always amazes!
I think you've done an amazing job, Lori !
Keep pressing forward with your eyes and before you know it, you'll be back to better than before !
Rose
Post a Comment