
Welcome Friends!
...a picture is worth a thousand words, right?
~ absolutely! but I will be adding words to my pictures,
to help you better understand my simple process of making a whisk broom cover
{or small child's broom cover in this case}
the design shown in the photos are of my 'Sylvia Thistlebroom' pattern,
available in my Etsy shop as a paper pattern or PDF download...
the pattern itself will also come with basic finishing instructions as well as link back here to this photo pictorial...
Most hardware stores carry whisk brooms, also small children's brooms as well ~
I collect antique whisk brooms and antique children's brooms and find that the straw portion of the brooms themselves
are usually all around the same size width/length, making this pattern template a good fit for all the above :)
Let's get started, shall we??
In your purchased pattern, you will find the template page for the broom cover ~
you will need to cut it out on the drawn line as it is actual size with no seam allowance.
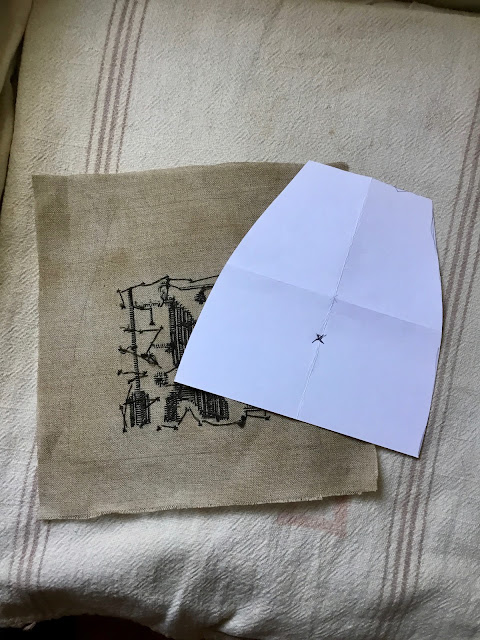
you will notice an 'X' on the paper template....

you will also notice a hand drawn 'X' on your cross stitch graph,
these will be a placement guide to line up the x's ,
enabling you to trace the paper template correctly to your finished/stitched project...
I hold my finished stitch and my paper template together
{with the paper template on the BACK of my finished stitch} to line up my x's,
then I pin thepaper template to the back of my finished stitch, and using pencil and a light hand,
I trace ALL THE WAY AROUND the edges of the paper template onto the back of your finished stitch

{{photo below showing the penciled trace line around the finished stitch, on the back of your project.}}
Now I laid my backing fabric FACE UP on my worktable:
{in this case a brown/cream reproduction cotton ticking, which is reversable}
--> with the lines of the fabric going horizontal ~ and placed my finished stitched project
FACE DOWN on top of the ticking. {you can use any fabric you prefer for the backing}
using straight pins, I pinned the front {finished stitch} and back {ticking} together...

now I machined stitched down both sides ONLY of the project ~
stitching directly on my penciled trace line/template shape...
leaving both the top and bottom of the project open or, unstitched.

in the photo below, you can see that I have penciled additional and angled lines coming up from the top {open} portion:
this is so when you turn the project right sides out, your stitched seam will follow the angle of the sides of your broom cover ~
I also did the same to the bottom portion of the project ~ you may or may not wish to machine stitch on these lines as well, but I prefer to.

I like to use pinking shears when I am cutting out a project from, or trimming linen.
it helps prevent fraying tremendously!
I trim usually a 1/4" away from the machine stitching.
below you can see the stitched project, still with right sides together...and top and bottom open, or unstitched.
*** make a note that I still have the horizontal pencil lines at the top and bottom of the project***
these lines, will become necessary when you turn your project right sides out :)

NOW you may turn your project right sides out ~
and, using the above mentioned horizontal penciled lines at the top and bottom of your broom cover,
fold the linen and backing fabric {ticking} BACK {or to the inside} of your project ad pin in place using straight pins...
Back of broom cover ~

Front of broom cover ~

once your broom cover is turned and pinned,
you will want to stitch down the 'tucked in' portion of the top and bottom open edge,
to keep the turned-back edges it from flapping out...
I used Valdani pearl cotton color M90 and a long blanket stitch
~ completely along the top and bottom open-edges.
I also added a sprinkling of buttons {totally optional, up to you!}
and some ribbon held on with.a rusty safety pin ~
I also went back and, after all stitching and project was completed,
~ severely stained my linen and backing fabric with a coffee stain.
{again, totally optional and up to you!}

I hope I have shown well, how simple this finish can be,
and if you have any questions or need my help, email me!
Notforgottenfarmwitch@gmail.com