
~ A Punch Needle Tutorial - of sorts ~
Well Hello!!
I am attempting to show you via photos
how I work with my punch needle....
I have been needle-punching for over 20 years ~
I am a fast & furious puncher and enjoy it immensely...
and I have been blessed to have taught lots {and lots!} of folks
how to needle punch up and down the East Coast and into the middle states ;)
*Disclaimer*
I have a cat.
so there are cat hairs in my photos {gasp!}
on we go then....
This is a design that I have named
'Love Shack'
and here it is in it's finished-finished state ~

for larger designs,
I use my Hookinpunch© gripper frame from Notforgotten Farm™
and a MEDIUM tip Ultra Punch {Cameo} punch needle.

my threads of choice are DMC 6 strand cotton floss
& Valdani pearl cotton size #8
when working with Valdani,
I DOUBLE the thread and use it in my MEDIUM tip punch needle...
it punches up wonderfully & full.
and when working with DMC thread, I use ALL SIX STRANDS at once.
I usually keep my Ultra Punch Needle with MEDIUM top set on the #1 or lowest setting,
unless I'm working on a dimensional project, then my pattern instructions will dictate that for you.
 |
| back or working side of my project and the first cat hair! |
As you can see in the photo below,
the darker ground under the house has been punched totally horizontally,
but I wanted to change my direction for more movement in the design.
this is called Directional Punching.

so I penciled in some guide-lines...

then punched them...

then filled them in more...
...until the bottom of the heart shape was completely filled in {below}.
this lends an old look to my work, and keep the eye moving ~

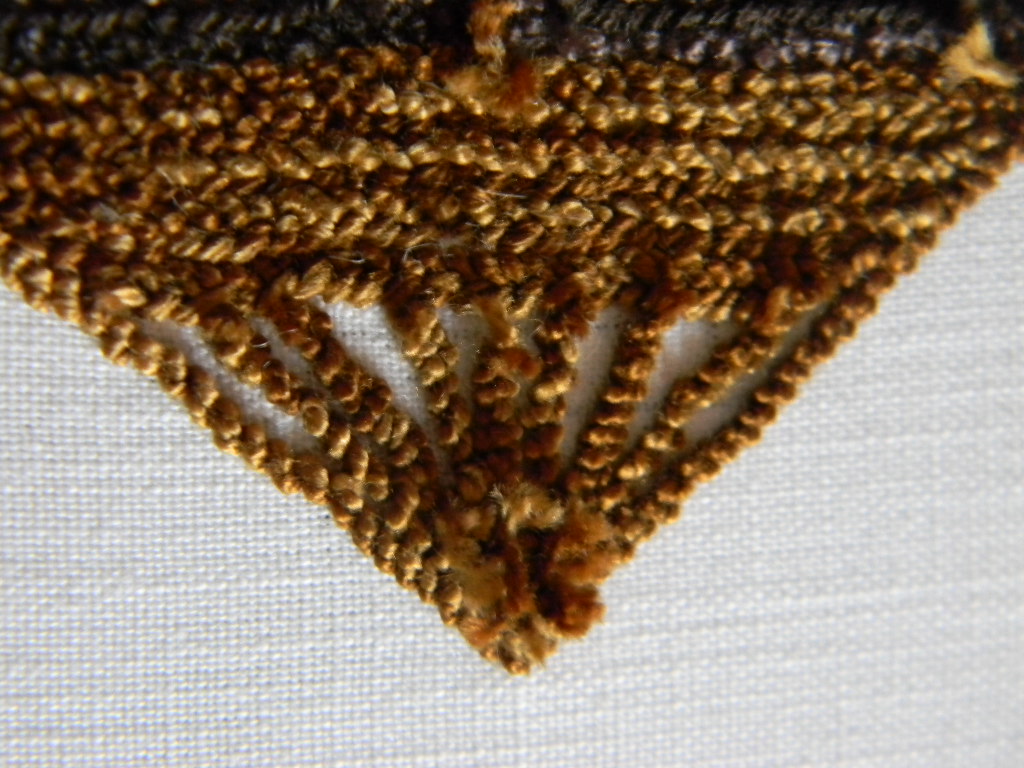
I also have a trick that I use before I outline my border row:
as you can see in the photos below, I leave a space between the motif and the border-row...

so when I do punch the border-row the motifs don't interfere with the row
and I don't accidentally 'blend' my threads... leaving both nice & crisp.


now the MOST IMPORTANT thing I do is this:
looking at the photos below, you can see that I keep the 'eye' of my needle
against my previously punched row - and I punch SUPER CLOSE to my previous row!!

neat & tidy, huh?

I will outline all of my motifs this way, then continue to hold my needle in the same position while I finish the fill-in of the background.


But, before I fill in the background, I want to keep it from looking flat or static...
so I pencil in more guidelines to break up the expanses in the unfinished background:


now the next photo below show a very vague way of how I will punch each penciled in section...
no, I don't draw these little arrows in when I'm working,
~ but for this little tutorial they are there for you to see :)


So now once the majority of the background has been filled in with the Valdani #8 pearl cotton,
for added interest, I am using 6 strand DMC cotton floss in a complimentary color value ~
I like doing this, as it also lends an old look and makes my work more interesting to me.
~


Here is the shaggy back of my work, or the 'working' side.
Notice I trim my threads away as I work, so they do not get accidentally pushed to the front...
and you can clearly see where I used the non-variegated DMC floss in little 'puddles'
{upper left of heart}.

So now to finish-finish this project into a stuffed pillow or pinkeep:
Once I have trimmed away any snags or long loops from the front of my project,
I will lay it face down on my backing fabric, which is face-up on my work surface.
Then I carefully machine stitch ALL THE WAY AROUND the entire finished project
coming as CLOSE to the last punched row as I can...
Yes you will catch your loops with the machine, and that is ok!!
**{photos below show a different project but clearly show the technique}

can you see the darker line under my last punched row of white thread?
that is my machine-stitched line.

Now once I have machine stitched all the way around my project,
using PINKING SHEARS I trim away the excess weavers cloth
to within 1/4" from my machine stitching...
~ then I make a slit in the backing fabric and turn my project right sides out.
Save a piece of the backing fabric to use as a patch to cover the opening!!

I like to use cotton balls, sawdust or clean scraps of fabric for stuffing,
~ but for this it's cotton balls.


I will unroll the cotton balls and use a chopstick
to stuff the project firmly...


now you can cover the slit with the scrap you saved:


...and there you have it!!

I am always available to answer your questions ~
Hope you enjoyed this!
~ Lori
Absolutely wonderful! Very good photos and written instruction. I LOVE And ADMIRE YOUR WORK!
ReplyDeleteThank you Lori. This really helps. I would probably draw the arrows, great idea! I've always wondered if you just cut the ending thread short as is or somehow secure it. Does it not pull through to the front? This and your new little hearts are just so darling, may finally give it a try.
ReplyDeleteThank you from a true beginner. You answered so many questions and I will refer to the tutorial many times. Ana Sweet usa
ReplyDeleteI love your designs, did the cats several times in different threads and colors. Thanks for the demo.
ReplyDeleteHi Lori!
ReplyDeleteHope you're feeling better. I just love the tutorial and the "Love Shack"!
Thanks for great tips.
Martha
Thanks so much for this! Such a cute design too.
ReplyDeleteWhat a great tutorial to bookmark!! And I was pleased with the way you sewed the back after stuffing the little pillow...a patch! Brilliant.
ReplyDeleteThank you so much for the very interesting little tips ...the way you create movement & make little puddles of coordinating colors & stuff things with cotton balls !!! Changing directions with your threads just adds so much more interest too .
ReplyDeleteI bought a bag of cotton balls for my Grand Daughters to glue on snowmen at Cmas ....they lost interest so quickly being only 4 , it was much more fun to have a Snow Ball fight with them !!! They were everywhere !!! A fun memory !
Thank you again !!!!
Wow, wonderful art, fabulous step by step (even I can understand). Thank you for your time and sharing your talents.
ReplyDeleteI really enjoyed your tutorial, so many wonderful tips. Am punching a design at present and will certainly apply your tips. Thank you ,Lori
ReplyDeleteGreat tutorial,, lori,,,,
ReplyDeleteThanks for sharing,,,,
Sweet pattern,,,,,
Hope u r feeling better now,,,,
Wonderful and inspiring tutorial. Glad to see you use the cotton balls. I have used them a time or two and wondered if anyone else did. You just answered my thought.
ReplyDeleteThis gives me hope. Thank you.
ReplyDeleteGreat tutorial!
ReplyDelete😍 thank you so much Lori! Love this cute heart!!! You are awesome. ❤
ReplyDeleteWhat a beautiful project! Thank you for the detailed explanations and the great photos, too. I have a couple of questions I hope you can answer for me. I use an Oxford punch needle, but I'm guessing the finished craft is basically identical (or maybe not at all--I'm new at this). I've been working on a large rug for my bedroom. The backing is two burlap coffee sacks sewn together,so really uneven weave, but I'm using thick churro wool and so far everything looks good. However, the burlap sacks are fairly heavy and, as I punch more and more wool, the project getsheavier and heavier. The result is that I can't really hold the sack in such a way that I'm able to get perfectly consistent loops on the nappy front side. From time to time, I'll have a pretty big loop. So this is what I did: I just trimmed the fugitive loops. Now I'm concerned that the finished rug will pull apart in places if people (or the cat) tug at it on the wrong place. Is this a problem you've encountered before? I plan on sewing a backing to it. Are there any tricks to securing the loops? Or is it misguided to make a floor rug with this technique?
ReplyDeleteThanks for any tips you can provide me!
This is a really informative article for readers and you have provided an excellent details in your post APPRECIATED!!!.
ReplyDeleteThis comment has been removed by a blog administrator.
ReplyDeleteI have read your blog article and it is really amazing for developing my skill in concern department you're truly an amazing writer really appreciated. Now get jacket back digitizing with sharpest result by using our service.
ReplyDeleteI have read your post and this is simply an amazing to increase embroidery knowledge for beginners really appreciate your writing skill.
ReplyDeleteThanks for the beautiful artwork of embroidery digitizing and the easiest tutorial for starters. Good job.
ReplyDeleteReally this article design is very gorgeous. i am very impressive, because you made heart embroidery.i will share to my friends, when they see this article so very be happy.
ReplyDeleteThis comment has been removed by a blog administrator.
ReplyDeleteExcellent information and beautifully described. The photos are great. Well done!! I learned so much about punching. Thank you so much!
ReplyDelete